A New Bootable USB Solution
The Windows 11 startup issue can be caused by many reasons, like faulty system files or disk errors. If you are experiencing the problem right now, do not worry. This article from EaseUS presents you with 9 solutions to repair the Windows 11 won't boot problem.
From running Startup Repair to resetting your Windows 11, you can learn various troubleshooting methods to resolve the booting issues. Continue reading and see how to do it and the reasons why your operating system can't boot up.
Many users tried a lot of solutions for internal problems and still cannot boot up the computer. It is most likely that the problem is caused by an outside source. Thus, before performing any other repair for system issues, check if your peripherals are correctly installed. The monitor, power source and cables, external devices, motherboard, CPU, GPU, etc. could all be the cause of the issue.
If they are installed correctly, read on. The following methods are ranked by difficulty and solution efficiency.
Missing or damaged system files is one of the reasons why you can't start the computer. To fix such a problem, you can resort to Windows Startuo Reoaur.
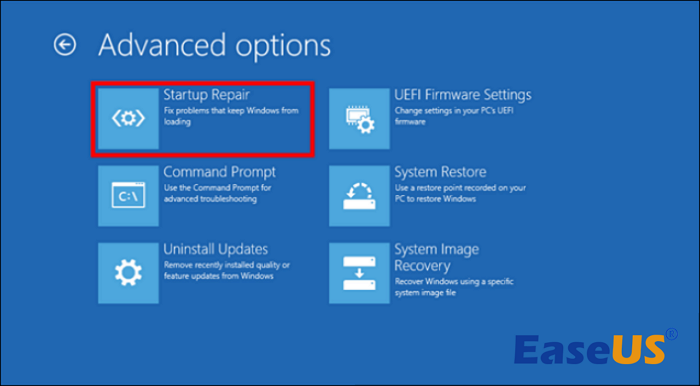
Startup Repair is a Windows built-in troubleshooter designed to resolve issues with booting up. It checks your system and repairs errors it discovers.
Step 1. Boot up your computer and hit "F11". (The key may differ according to different motherboard manufacturers.)
Step 2. Click "Troubleshoot > Advanced options > Startup Repair".
Step 3. Then, follow the instructions on the screen to execute a Startup Repair procedure.
Step 4. After the process is complete, restart your computer to check if the problem has been resolved.
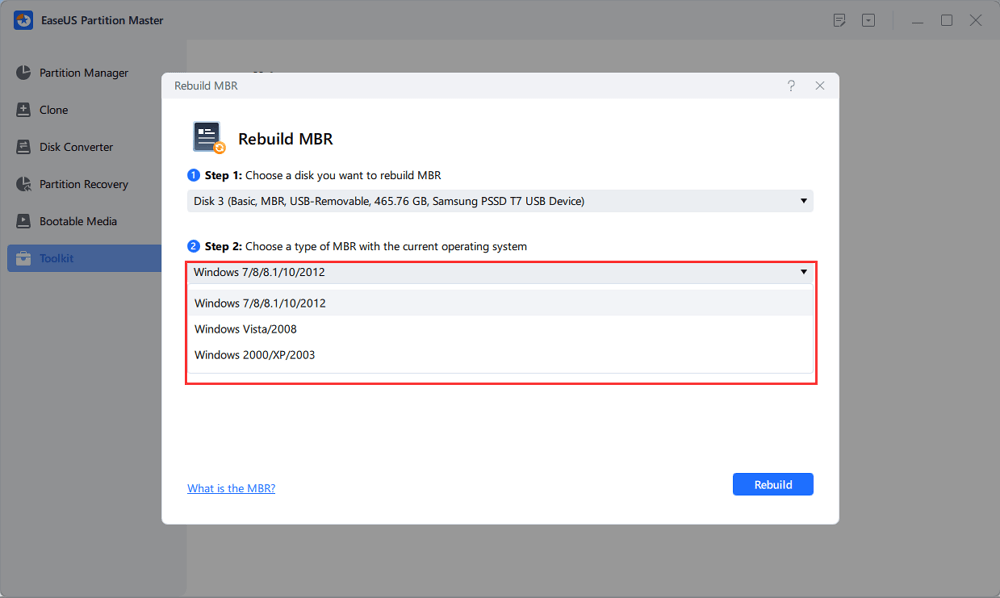
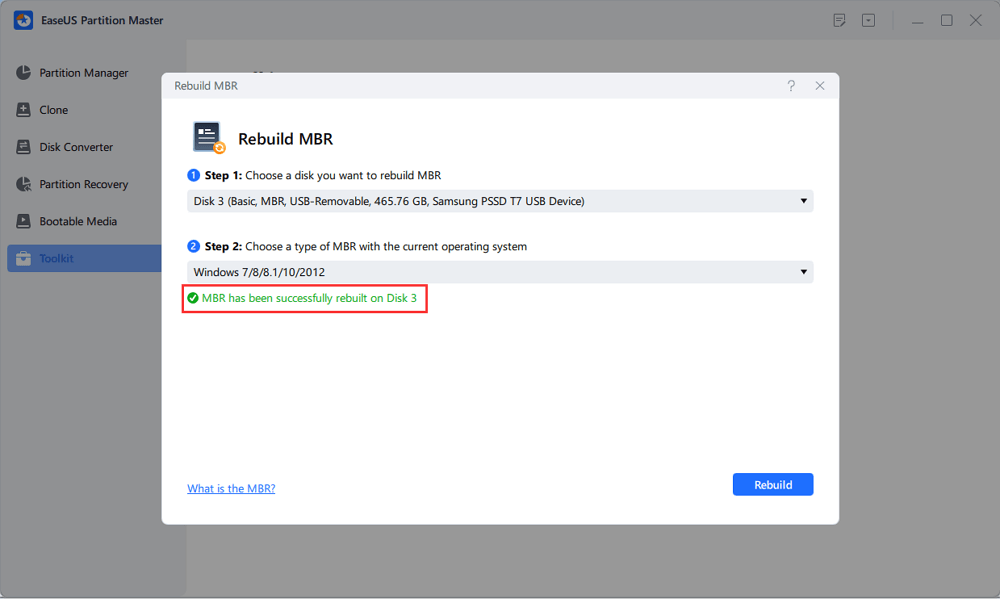
MBR errors can also prevent your computer from booting up normally. You may see an error message showing that there was a boot failure because the operating system could not be found. It could be MBR error 1, MBR error 2, or MBR error 3. Or, there is just a blank screen with no indication.
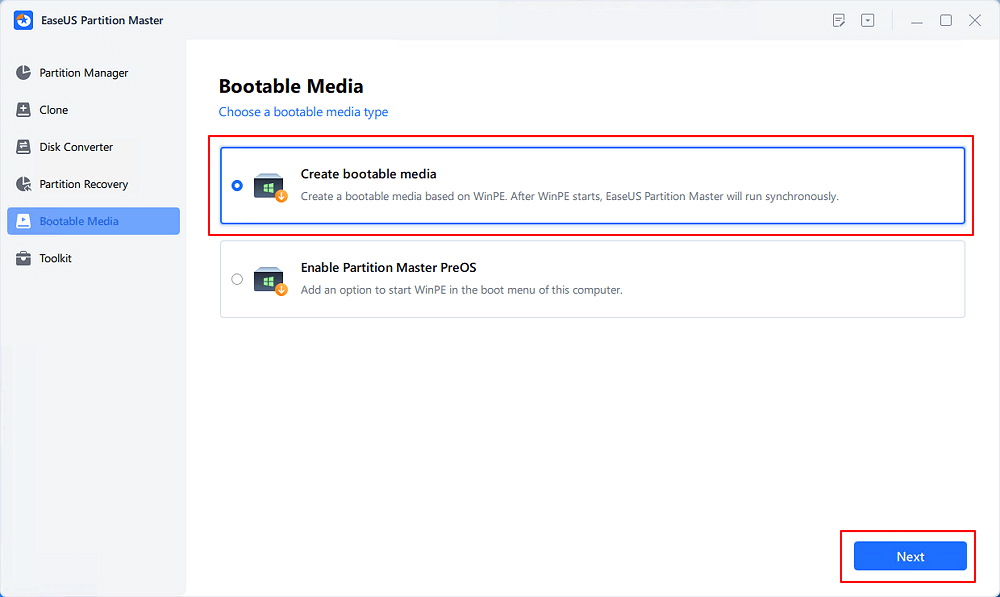
You can rebuild the MBR to fix it with EaseUS Partition Master. This tool provides a friendly interface and easy steps for users who know nothing about commands.
Step 1. Create a WinPE bootable disk
Step 2. Boot EaseUS Partition Master Bootable USB
Step 3. Rebuild MBR
Step 4. Reboot your computer and see if you can enter the system.
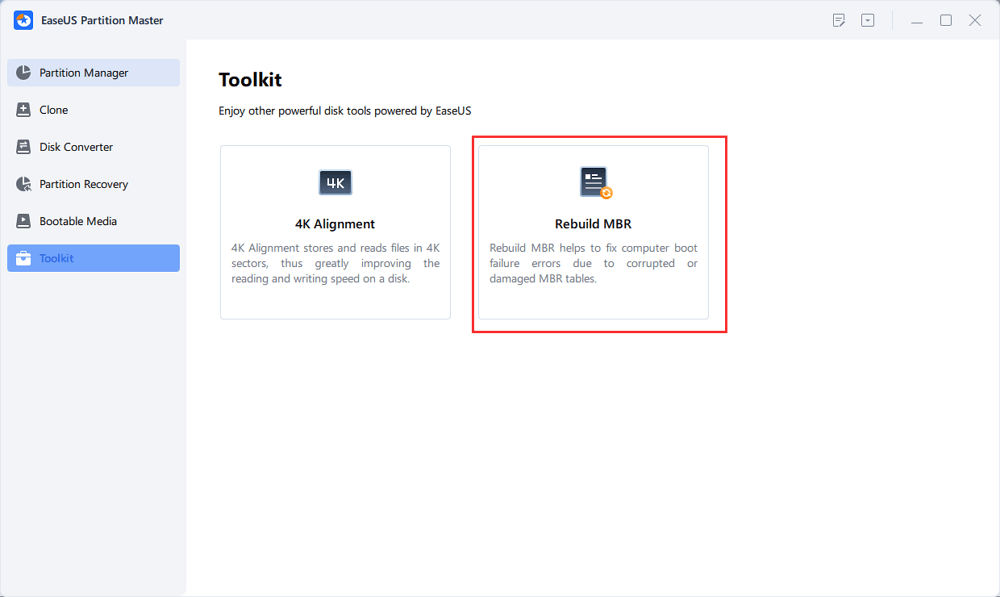
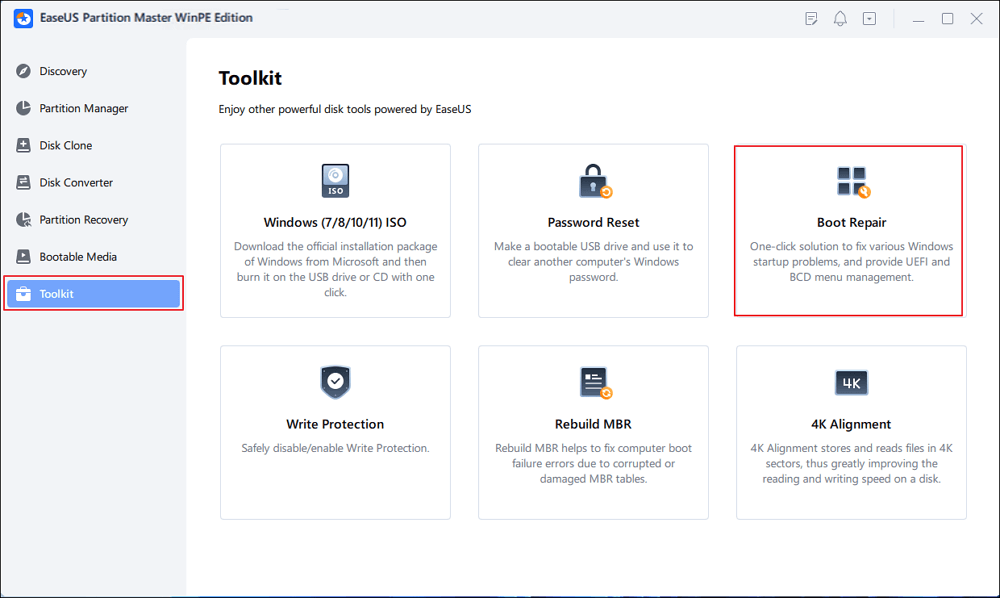
This is also a common startup issue. A message presenting error codes like 0xc000000f, 0xc0000098, 0xc0000034, etc. are possibly caused by damaged or missing BCD. However, you can still use EaseUS Partition Master to repair this easily. One of the powerful features of this tool is to rebuild BCD. It can fix BCD-related problems effectively.
Step 1. Connect an external drive/USB to another computer. Launch EaseUS Partition Master. Then, go to "Bootable Media" and choose "Create bootable media".
Step 2. Select the drive you just connected. Then, click "Create." You can also burn the Windows ISO file to the storage media.
Step 3. Insert the bootable drive into the computer that can't boot. Holding F2/Del to reboot to the BIOS. Then, set to boot from the WinPE bootable drive and press F10 to exit.
Step 4. Reboot your PC and enter the WinPE. Then, open EaseUS Partition Master and click "Boot Repair" under the "Toolkit" option.
Step 5: Select the faulty system and click "Repair."
Step 6. You will get a message suggesting the system has been successfully repaired. Click "OK" to complete.
Step 7. Set the system to boot from the original drive and restart.
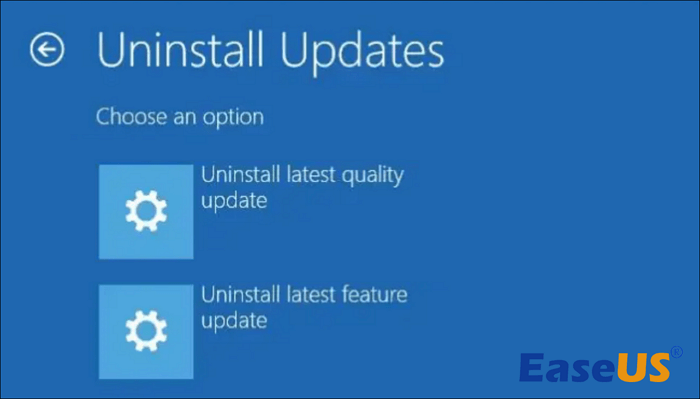
The latest update for Windows 11 might make your computer unbootable because of incompatible patches or unexpected bugs. This kind of problem can be easily fixed by uninstalling the latest Windows 11 update.
Step 1. Power up your PC and press "F11".
Step 2. Go to "Troubleshoot > Advanced options > Uninstall Updates".
Step 3. First, try "Uninstall latest quality update" and restart the computer. If you succeed, congratulations. If you fail, move to Step 4.
Step 4. Select "Uninstall latest feature update". Then, restart your computer and check the state.
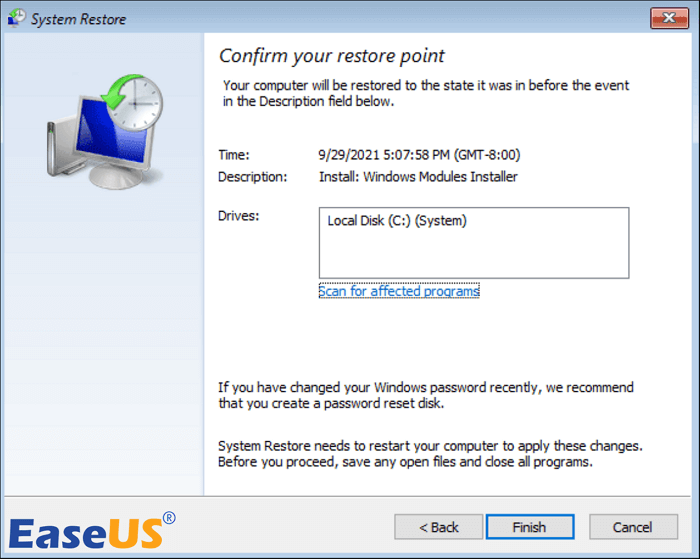
If you have created a restore point recently, you are lucky to have another solution to fix the Windows 11 can't boot up problem. By default, every time you install a new Windows update, your computer creates a System Restore point automatically. You can restore the system to the previous stable version to get rid of serious issues.
Step 1. Restart your PC several times when the logo appears or boot it from an installation USB/disc.
Step 2. Go to "Troubleshoot > Advanced options > System Restore".
Step 3. Click "Next" at the System Restore widget window.
Step 4. Select the latest restore point. Then, click "Next".
Step 5. Confirm the message and click "Finish".
Step 6. Restart the PC and see if it works.
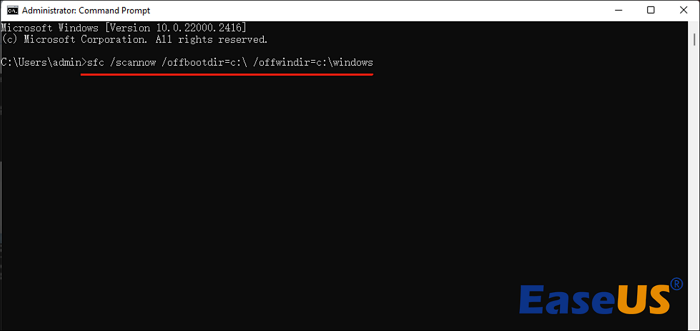
You can use CHKDSK commands offline to repair disks and recover data from corrupted drive sectors. This Windows program analyzes drives and informs the state of partitions and stored data. Then, it will determine the source of the problem and then solve it.
Step 1. Power up your computer and hit "F11".
Step 2. Go to "Troubleshoot > Advanced options > Command Prompt".
Step 3. Type in sfc /scannow /offbootdir=c:\ /offwindir=c:\windows and hit "Enter".
Step 4. Reboot your PC and check if it can start up as usual.
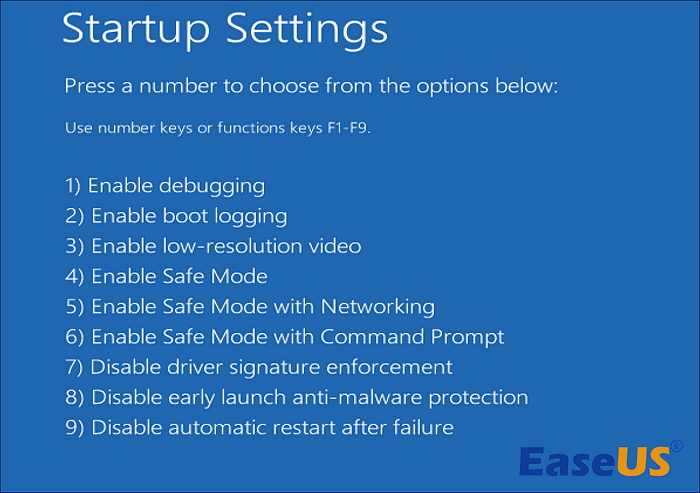
If you can’t boot up Windows 11, you can try to access Safe Mode. Performing a clean boot might help you fix the problem and get your computer back to normal.
Step 1. Boot up your computer and hit "F11".
Step 2. Go to "Troubleshoot > Advanced options > Startup Settings > Restart".
Step 3. Hit "4" or "F4" to access the Safe Mode.
Now, perform a clean boot in Safe Mode to find out which apps are causing this problem.
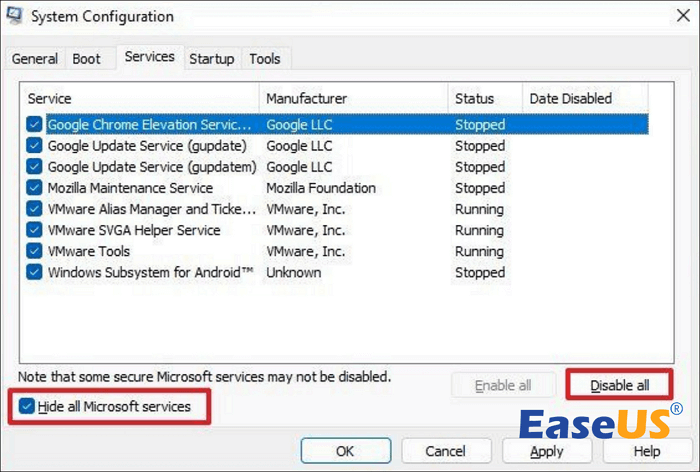
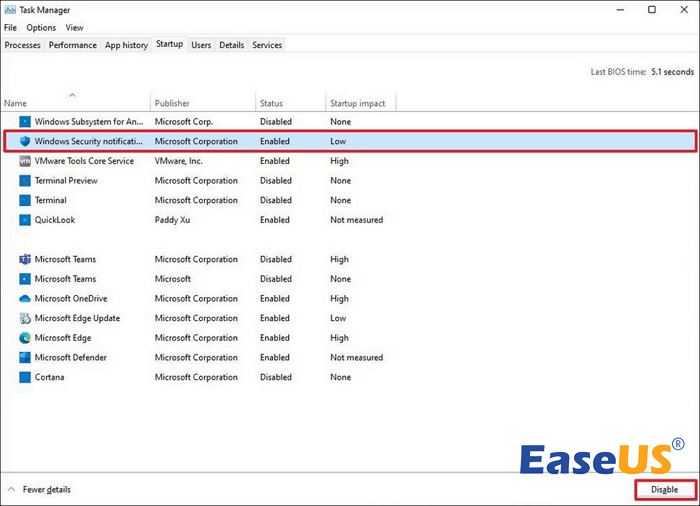
Step 4. Open Start. Type in msconfig in the search box. Then, open the System Configuration.
Step 5. Go to "Services", then tick "Hide all Microsoft services" and select "Disable All".
Step 6. Move to "Start Up" and click on "Open Task Manager".
Step 7. Check "Start-Up Impact". Select all apps with "High" impact and click "Disable".
Step 8. Reboot your computer, and it will start up in clean boot mode.
If you've recognized the apps that are preventing you from booting into Windows 11, make sure to uninstall them.
The latest Windows 11 updates are fast changing the OS and how it functions. You must ensure that your TPM and Secure Boot are enabled to allow Windows 11 to boot normally.
Step 1. Boot your computer into Safe Mode like the last method.
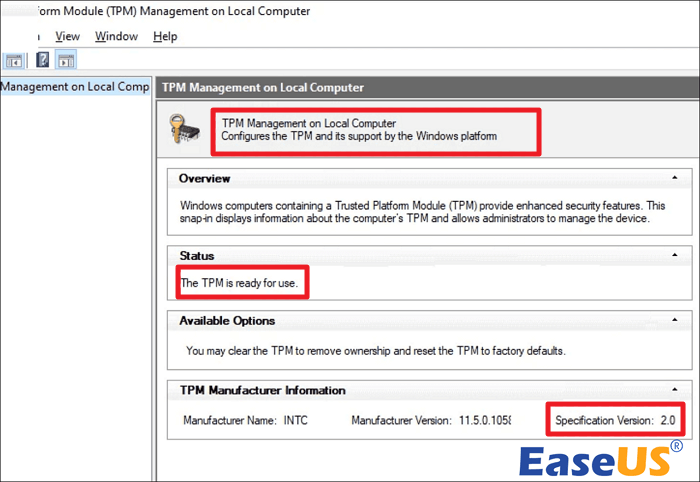
Step 2. Open Start. Type tpm.msc in the search box and open the "Trusted Platform Module Management" tool.
Step 3. Check the Status section. Ensure there is a message saying: The TPM is ready for use.
If the TPM is disabled, you should enable it.
Step 4. Open Settings. Select "Update & Security > Recovery". Click "Restart now" under Advanced Startup.
Step 5. After your computer reboots to Windows Recovery Environment. Go to "Troubleshoot > Advanced options > UEFI Firmware Settings". Then, hit "Restart" on the next page.
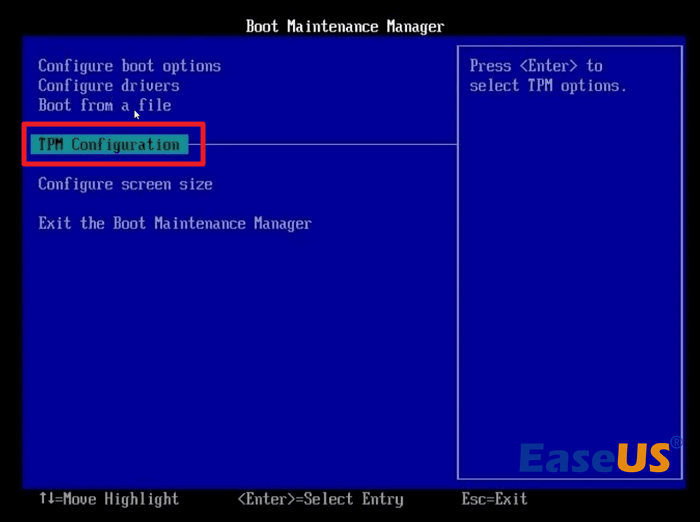
Step 6. Your computer will access BIOS. Move to "Secure" and select TPM Configuration. Set the TPM as "enabled".
Step 7. Press "F10" and exit. Your PC will reboot.
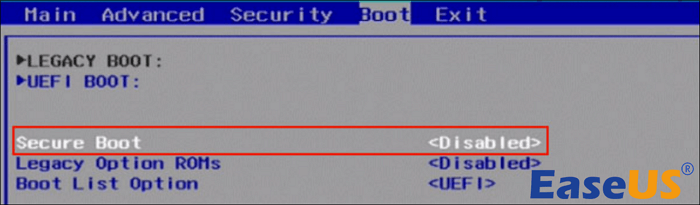
Then, you should also check the Secure Boot mode.
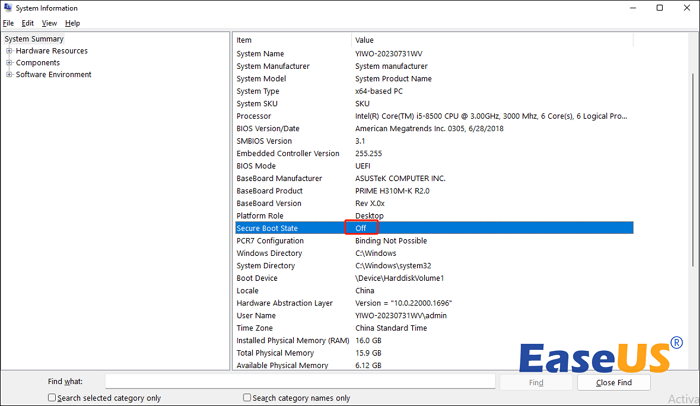
Step 8. Open Start. Search for and open "System Information".
Step 9. Find the Secure Boot State under System Summary.
If it's Off, you need to turn Secure Boot on to fix the problem.
Step 10. Open Settings. Select "Update & Security > Recovery". Click "Restart now" under Advanced Startup.
Step 11. After your computer reboots to Windows Recovery Environment. Go to "Troubleshoot > Advanced options > UEFI Firmware Settings". Then, hit "Restart" on the next page.
Step 12. Your computer will access BIOS. Move to "Boot" and select Secure Boot. Set it from "Disabled" to "Enabled".
Step 13. Press "F10" to save the changes and exit, and your PC will reboot. Then, your computer should be able to start normally.
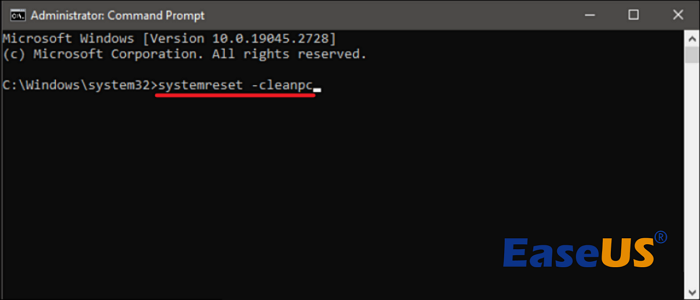
If all of these methods fail to resolve the Windows 11 won't boot problem, the final option is to perform a factory reset.
Step 1. Press "F11" when your computer is booting up to get into the Windows RE.
Step 2. Click "Troubleshoot > Reset this PC".
Step 3. Choose "keep my files" and follow the guide to complete the process.
This method should be able to resolve all the internal problems. Now, check if your computer is able to boot up.
Internal and external issues can both cause a situation in which Windows 11 cannot boot up. Here are the most common causes.
Issues of peripherals. Peripherals like a bad monitor, faulty power source or cables, incompatible external devices, corrupted motherboard, CPU, and GPU can all be the reason why you can't power up your computer.
Corrupted boot-related data. If System files like MBR or BCD are damaged, the operating system will have trouble booting up. If it happens, you will encounter MBR errors or BCD errors. Such data are highly related to the procedure of booting up a computer.
Issues with third-party software. A background third-party software can also cause the problem. If the software contains dangerous bugs or is malicious, your computer is at risk of facing various troubles, including startup issues.
Problematic Windows update. The newly released Windows update could contain incompatible patches or unexpected bugs. Such factors may affect your operating system and cause it to be unbootable.
Disk error. If there's a bad sector or other problem on your disk, you probably cannot power up your computer normally. It could be disk metadata corruption, disk write errors, or disk partition style errors.
When you power up your computer and Windows 11 won't boot, it is natural to panic. In this post, we offer 9 solutions to help you resolve the issue quickly. Once you've recognized the cause of the problem, we recommend taking the appropriate measures to fix it and find a way to avoid such errors in the future.
Below are some other often-asked questions related to "Windows 11 won't boot". Read and see if they help you.
The display connection should be checked if you have a blank screen during boot. It is the cause of many black screen issues. Remove and reconnect all your monitor cables to ensure they are properly connected. Then, ensure that your monitor is turned on.
If you cannot boot your computer, it is likely that your system requirements were not met before installation. As a result, you must check whether the computer fulfills the minimum system requirements for running Windows 11. If it does not satisfy the requirements, it will be tough to resolve the boot problem.
This boot loop problem has been reported frequently in Windows 11 and Windows 10. Windows 11 boot loop error is primarily caused by incorrect registry files, which can prevent computers from booting normally. This causes unlimited Windows startup boots and continuously restarting your computer.