Ventoy Persistence Plugin
Many distros (like Ubuntu/MX/LinuxMint ...) provide feature for persistence. This allows saving any changes you make to the live system, so that they are still present the next time you boot to it.
In normal case, we create a separate partition to do this which is not so flexible.
Now Ventoy brings a new feature here. You have no need to create any partition, no need to add persistent boot parameter. Just put a persistence data file in the 1st partition and tell Ventoy by the json configuration, and that's all.
You can put many different data files for different iso files at a time. You can also share a data file between different iso files as long as it can be supported by the distros.
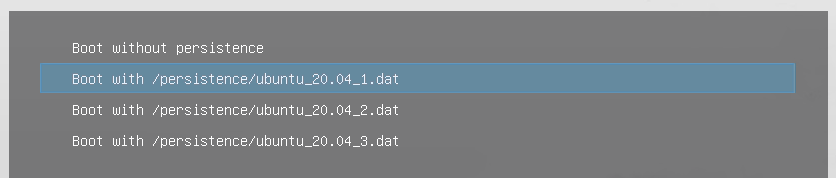
Even you can specify more than one data files to an iso file, Ventoy will provide a menu to choose before boot.
- 1. Supported Distros
Arch/Ubuntu and those distros based on them. Tested list: (Updating)
| Distros | Tested ISO | Label | Notes |
|---|---|---|---|
| Arch Linux | archlinux-2021.03.01-x86_64.iso | vtoycow |
Arch/ArchMan/ArchBang/ArchLabs/BlackArch... are also supported. |
| Ubuntu | ubuntu-20.04-desktop-amd64.iso | casper-rw |
|
| MX Linux | MX-19.1_x64.iso | MX-Persist |
|
| LinuxMint | linuxmint-19.3-xfce-64bit.iso | casper-rw |
|
| elementary OS | elementaryos-5.1-stable.20200405.iso | casper-rw |
|
| Zorin | Zorin-OS-15.1-Core-64-bit-r2.iso | casper-rw |
|
| Kaspersky Rescue Disk | krd18.iso | casper-rw |
|
| Kali | kali-linux-2020.2-live-amd64.iso | persistence |
Need -c persistence.conf option. And use Live USB Persistence boot option. |
| CloneZilla | clonezilla-live-20200703-focal-amd64.iso | persistence |
Need -c persistence.conf option |
| Fedora | Fedora-Workstation-Live-x86_64-33-1.2.iso | vtoycow |
Need to add selinux=0 in the boot option |
- 2. Json Configuration
Recommend to use VentoyPlugson, a GUI ventoy.json configurator. Refer VentoyPlugson
A persistence array is defined to describe the configuration in /ventoy/ventoy.json.
{
    "persistence": [
        {
            "image": "/ISO/MX-19.1_x64.iso",
            "backend": "/persistence/MX-19.1_x64.dat"
        },
        {
            "image": "/ISO/ubuntu-20.04-desktop-amd64.iso",
            "backend": [
                "/persistence/ubuntu_20.04_1.dat",
                "/persistence/ubuntu_20.04_2.dat",
                "/persistence/ubuntu_20.04_3.dat"
            ],
            "autosel": 2
        },
        {
            "image": "/ISO/kali-linux-2020.2-live-amd64.iso",
            "backend": [
                "/persistence/kali-linux-1.dat",
                "/persistence/kali-linux-2.dat",
                "/persistence/kali-linux-3.dat",
                "/persistence/kali-linux-4.dat"
            ],
            "autosel": 2,
            "timeout": 10
        },
        {
            "image": "/linuxmint-19.3-xfce-64bit.iso",
            "backend": "/persistence/linuxmint_19.03.dat",
            "autosel": 1
        }
    ]
}
| Key | Type | Description |
|---|---|---|
image |
STRING |
The full path of the iso file. This option supports fuzzy matching, please refer About Path Matching |
backend |
STRING or ARRAY |
The persistence backend image file path for the iso file. Can be a single string or string array. |
autosel |
INTEGER |
Optional. If you set it, that means you auto select the corresponding option in the prompt menu. If not set, default is 1. 0: boot without persistence backend image file 1: boot with the 1st persistence backend image file 2: boot with the 2nd persistence backend image file 3: boot with the 3rd persistence backend image file ...... |
timeout |
INTEGER |
Prompt menu timeout. Optional, if you set it, the value must be greater than or equal to 0 When greater than 0: Prompt menu will be popped up, the default selected menu item is as described above, when timeout the corresponding menu item will be selected. When equal to 0: Prompt menu will be popped up, the default selected menu item is as described above, no timeout, will wait for user selection all the time. When not set: if autosel exist, then the corresponding menu item will be used and the prompt menu will NOT be popped up anymore.if autosel not exist, it's the same as it set equal to 0. |
- 3. Multi-Mode
Supported. You can set different configurations for different BIOS mode. Please refer Multi-Mode Option for details.
- 4. Backend Image File
The backend image file is a disk image with a label. You can directly download the pre-created image files or create it by yourself.
Download pre-created
You can download pre-created image files from https://github.com/ventoy/backend/releases
Create by yourself
If you don't want to use the pre-created file and want to create it by yourself. I have provided a CreatePersistentImg.sh script here.
Download it and just run sudo bash CreatePersistentImg.sh in the linux shell, by default a persistence.dat file will be created with size=1GB fs=ext4 label=casper-rw.
sh CreatePersistentImg.sh  [ -s SIZE_IN_MB ] [ -t FSTYPE ] [ -l LABEL ] [ -c CFG ]  for example:

sh CreatePersistentImg.sh                 ---->  persistence.dat in 1GB size and ext4 filesystem and casper-rw label
sh CreatePersistentImg.sh -l MX-Persist   ---->  persistence.dat in 1GB size and ext4 filesystem and MX-Persist label
sh CreatePersistentImg.sh -s 2048         ---->  persistence.dat in 2GB size and ext4 filesystem and casper-rw label
sh CreatePersistentImg.sh -s 4096 -t xfs  ---->  persistence.dat in 4GB size and xfs  filesystem  (ext2/3/4 xfs are supported)  and casper-rw label

sh CreatePersistentImg.sh -l persistence -c persistence.conf  ---->  persistence.dat in 1GB size and ext4 filesystem and persistence label. Finally will create a
persistence.conf file inside the persistence.dat. The file only has 1 line "/ union". Some distros have this requirement (e.g. Debian/Kali/CloneZilla...)
- When creating the image file and copy to USB, take care about the buffer. (use sync to flush the data to the disk)
- Different distros use different Labels by default, for example ubuntu use casper-rw and MX Linux use MX-Persist, you can use -l to set it
- The backend image file must be put in the first partition. It can be in the root directory or any subdirectory.
- Once you have made a backend image file, you can compress and save it as a template in your computer (very small after compressed).
- 5. Extend persistent dat file
Sometimes, you may find that the persistence space is insufficient after a period of use.
Of course you can use a new bigger persistence dat file, but you need to backup and restore your old data.
Here I provide ExtendPersistentImg.sh script for you to nondestructively extend the persistent dat file.
Just download and run it in a linux shell as follows:
sudo bash ExtendPersistentImg.sh  datfile extend_size_mb
For example:
sudo bash ExtendPersistentImg.sh  persistent.dat 2048
That means extend persistent.dat by 2048MB (+2GB), if the old size is 1GB, then it will grow to 3GB after you extend it.
- 6. Shrink persistent dat file (1.0.53+)
This case is not very common. Assume that you created a very big persistence dat file at first and want to nondestructively shrink it now.
You can give a negative number to ExtendPersistentImg.sh as follows:
sudo bash ExtendPersistentImg.sh  persistent.dat -2048
That means reduce persistent.dat by 2048MB (-2GB), if the old size is 8GB, then it will reduce to 6GB after you shrink it.
1. Only dat file in ext4 filesystem is supported. XFS is not supported because XFS filesystem can not be nondestructively shrinked.
2. You must make sure that after shrink the dat file can still hold all the files inside it.
- 7. Prompt Before Boot (1.0.12+)
When you boot an iso file with persistence config, a prompt will be shown. You can choose whether to use the persistence image and which image to use for this time.